

(Please excuse the messy carpet and moving box. We are in transition...again.)

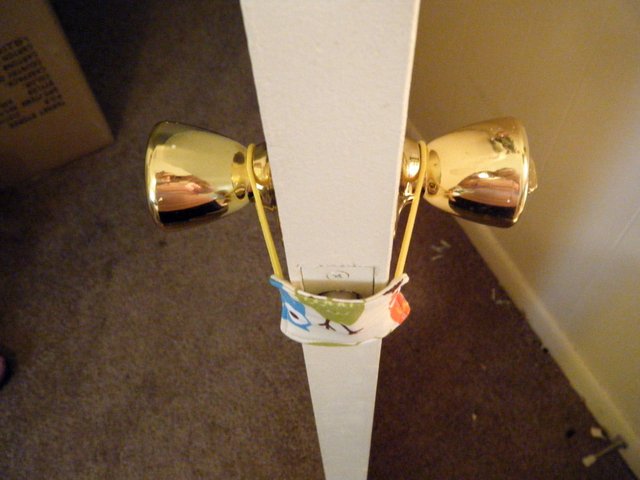
The door can still shut like normal without any latching going on! Great, huh!?
Instructions to Make Your Own:
1.) Cut two squares of fabric measuring 2 1/4" wide by 2 3/4" tall. I used quilting fabric.
2.) Cut one piece of fusible or sew-in batting using the same measurements. (I use sew-in)
3.) Place the batting on the wrong-side of one square of fabric and pin or fuse.
4.) Take a hairtie (the thin kind) and pinch it and place it along the edge and in the middle of one of the short ends of the square. Make sure the long end of the hairtie is in the middle of the square, not directed outward. Hold it in place until you get to your sewing machine.
5.) Do a tight zig-zag stitch to secure the hairtie in place in pinched position.
6.) Repeat for the other hairtie on the opposite side of the fabric square.
7.) Place the two squares together with right-sides facing.
8.) Sew a 1/4" seam around the square leaving about 1" to 1 1/4" open for turning inside out.
9.) Clip corners and any hairtie bulk sticking out.
10.) Turn rightside out, using chopsticks or something pointy to push out corners. Press opening.
11.) Stitch a 1/8" seam around the edge, enclosing the opening as you go.
12.) You're done!
I hope that made sense and please comment if it didn't! Have fun!


This is such a great idea, and would be so handy once W starts learning how to lock doors!
ReplyDeleteThanks, Callie! It has definitely come in handy with a 2 year old (which I believe Wyatt will be soon). They are also great for shutting the door and not making a sound when baby is sleeping.
DeleteI love this simple yet great idea! Thank you. And thank you for visit Heart for Home-making. Merry CHRISTmas
ReplyDeleteYour welcome and I am glad you like it! I love visiting your blog.
Delete