Showing posts with label Made for Me. Show all posts

Monday, July 7, 2014

Vintage Sheet Cafe Curtains


I was going to do a whole tutorial on how I did this but I am too tired now so I will cut straight to the point!!


Found these vintage sheets at Goodwill....


Cut them into rectangles using a sheet of computer paper as a template...


Sew them together and then make tabs for the top....

Aaaand...you have a lovely, cottage-y feeling cafe curtain for your window!!

I just adoooore this look because it is so girly and bright. The sheets are made of muslin so they have this gauzy look to them and they flutter a little in the breeze. The fabric is so thin that you can cut your squares in a jiffy by folding the fabric over on itself and cutting all the pieces at once. I did 4x.

I have a lot of material left over so I am going to make a matching valance and then maybe some more curtains for my other windows in the kitchen/dining area. SO fun!! And the huge sheets are only about $2 depending on where you get them. I found 4 different prints at Goodwill on separate occasions. There is so much you can make from vintage sheets--just look on Pinterest!! 

Saturday, March 16, 2013

Good 1/2 Hour DIY Project: Eye Makeup Remover Pads

I am going to make as many of these as I can in the next 30 mins before I have to go get hubby. The toddler is napping and I have a bunch of flannel that needs to be used up, so what the heck.

I have been using eye makeup remover for the past few months (never have before that, actually) and was using cotton balls to take the makeup off. They seem wasteful and expensive when you go through about 4-5 a day. I ran out and now I am ready to make something that I can throw in the wash and keep reusing.

I would like to try the homemade remover recipe as well, but don't have any unrefined coconut oil on hand (the stuff I have is better for cooking). I also don't have distilled water. Maybe once I run out of the store bought remover I will have to make up a batch.

I think I will need to make about 20 of these pads...I wear a lot of mascara sometimes!

I think that keeping a mesh laundry bag in the bathroom near the sink would be a good way of making sure they don't get lost in the jumble of dirty clothes. Otherwise, I can see these easily becoming lost like dirty toddler socks do...

Saturday, March 9, 2013

Bags Bags Bags! =)

Here are some new bags to share!

I completed the new style of bag in the grey birdie fabric last night. Here's the designer's photo of her bag.


Here's mine:

I really like this look! The fact that it is grey and black really irks me, but I still like it in the same breath. I tend to like bright colors for bags, as you may know, but sometimes it is good to mix things up.


I really am into adding hardware to bags now. I used to balk at the idea, but now I love the polished look they can give the bag.


Adding the solid black almost killed me (drama queen), but I think it makes it look more put together than if I had added another busy print.


I added two pockets to the inside since the pattern didn't call for anything. I hate trying to find my phone (that seldom rings, but still) and my mints/chapstick. The polka dots make it kind of fun to dig inside.


Here's the way it looks on. I like the size and shape, and how it hangs. It fits my large wallet and some other stuff.

The issues I had with making this bag was that the magnetic snap on the exterior was not in the right position according to the directions on the pattern piece. It was too low, so when you snap it on, it drags part of the upper back piece of the bag down with the flap. Also, the interfacing choice bugged me. It called only for midweight on the outside, but I hate a floppy, pansy bag so I added a interlining of flannel to the interior pieces and then an extra piece of flannel and lightweight interfacing to the top flap. After completing the bag, I realize that fusible fleece would have been the best choice for this hobo style since it has darts and a pliable shape. 

Man, I am a critical chick!! ;P

I also wished it had said to add some structure to the black tap flappy thing. It has nothing so it is very light and floppy. But I used a bottomweight twill so that is sturdier than if I had used a quilting fabric.

Overall, I like the look of this bag and would make some changes next time. I want to make another in a BRIGHT happy fabric and see how that comes out.

***

On to the next!

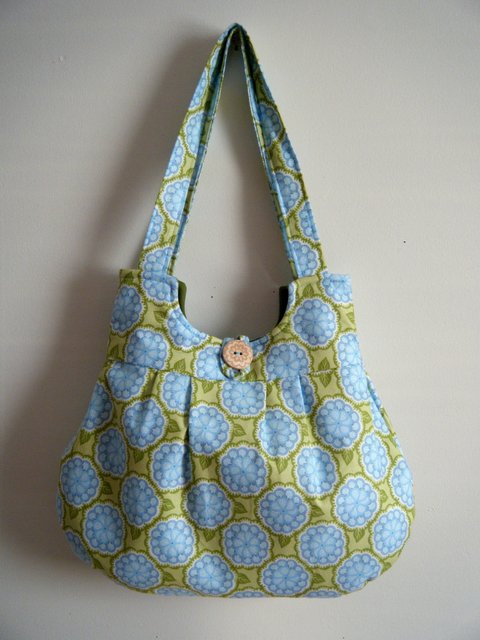
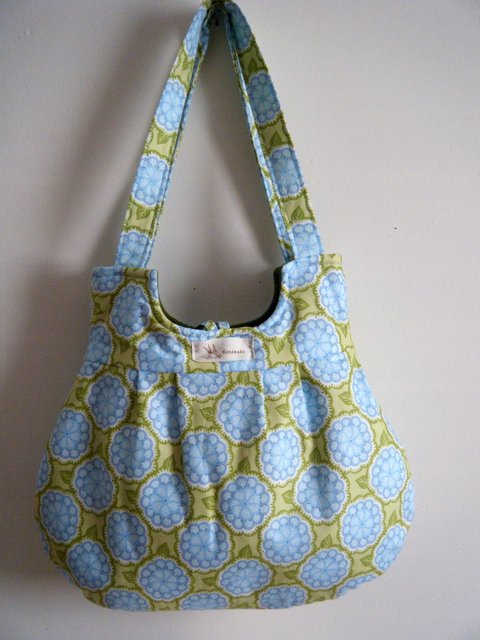
This is the second bag I made of the Simplicity Sweet Pea Tote pattern I posted about earlier.


This is some Kate Spain fabric that I really love. It reminds me of funky blue hydrangeas, a flower I really like.


I didn't add the o-rings to the straps to save time. I like it fine without.


This is the back side with the "handmade" tag I love so much!


Here is a button I added that I think mimics that print closely. It is wood and really fun.

I still love this bag pattern and highly recommend it! I could see making more in the future from this. 

This one is definitely my spring/summer bag for holding more stuff and it makes me smile with how bright and cheery it is.

Sorry to blab my head off! :) Ta!!


Friday, March 8, 2013

More Bag Making


I am going to attempt to make the above bag for myself soon. I just made myself a bag (the pink and brown one went to my sister so I made myself another one) that is blue and green, and I love it, but want to make another in this style. I love the shape and the o-ring strap. I think I am having the anxiety attack that I get in the 3rd trimester where I sew lots and lots because I know I won't have time for it later when he is born. Just getting it out of my system!!

This fabric below is the one I picked out for it. The one under it will be the lining, but it is actually a dark gray dot on a light gray background. Not exactly springy, but the birds were so awesome I had to go for it. I was thinking of doing a light yellow for the flap strap and shoulder strap.


They are having such a great deal on coupons at JoAnn's right now, I paid probably less than $5 for the supplies for the whole bag! =) Coupon commotions rock!!


Monday, February 11, 2013

Projects Done and WIP

Here is the patchwork pillow I kept yapping about before...the pillow form came in the mail the other day and it was so nice getting it delivered and for such a great deal! ($3.47!!)


This is my favorite part of the pillow (other than the embroidery...). To my loved ones who rest on this pillow, here is a message!

Close up of the stitching. This was a really quick one but a good starter design. No French Knots involved! I love how simple the image is.


Here is the patchwork for the front of my new bag I'm making. I have the embroidery done as well but didn't take a picture. Once I feel better I am going to get to assembling the bag. 


That's all for now...

Thursday, December 27, 2012

Some Projects to Share & Nesting

Hello! I would really like to start using my blog more to communicate and post photos rather than Facebook. I miss the days when I ran to my blog to share something a little more in depth than the quickie status updates I post so often now.

I have been bushed with trying to get one last custom order done of six (!) gathered wristlets while getting ready to move, taking care of my son all day, and being pregnant. It is quite tiring! But I always find a way to make room for my crafting hobby, or I will go crazy. I have a couple of things to share that I've made, and want to share my custom order with you once it's done and shipped to the recipient.

This is an envelope clutch I tried for the first time from a new pattern. I like the way it looks, but am not sure how functional it is for me personally. It has no depth, so it would only be good for carrying a smartphone or a few cards and phone for a party. I love the way the fabric combo came out though, and the button makes my day. :-)


There is just one slip pocket in the clutch as seen below. I am going to hold on to it and see if there is someone who might like it as a gift.


 * * * * *

Next up is a zipper pouch that I made as an experiment with covered zipper ends. I used the tutorial from this book. I tried it on one bag before, and kind of stopped there. To people like me, these little details are exciting! I love the crisp look of the ends of this pouch! Just look at those 90 degree angles! Yum! I just think they look much more professional than without. {Thanks for the lead on the great book, Bethany!}


I know, I am crazy...


Lovely fabric, isn't it? Amy Butler's Midwest Modern line, I believe. I stitched my old label on the front using embroidery thread and a hand needle. I like the "rustic" (is that the right word?) way it looks. Taking the time to add these kind of details really gives a nice feel to the pouch.

I put birdie silhouette fabric for the lining because it is so bright and cheerful and adds girlishness to the overall feel of the bag. This one I am going to use for toiletries that I use every day like hand lotion, lip balm, etc.


Well, I am 4 months along in my pregnancy and am really enjoying these slower, detail-oriented projects! I think it kind of goes hand-in-hand with nesting. I have an embroidery project I want to do before the baby is born, and I think it will be very enjoyable to have when I am waiting in Doctor's offices or wanting to relax at night. I am also really thinking hard about ordering this book on Amazon with my gift card because it looks and sounds amazing. I've always like embroidery, just never slowed down much to do it. Now is a good time. :)

Does anyone else do embroidery?

Happy Stitching! :)


Friday, September 7, 2012

Lunch Bag Project

Lunch bag, done! 

Bye, bye ugly plastic grocery bags or paper sacks. Here is your replacement...


This sucker is thick--a layer of insul-brite and canvas on the interior, and then nylon for the lining. I managed to keep myself from buying new fabric to use for this project and took from my stash to create the exterior. I like these 3 fabrics together and they feel very "lunchy" to me.

This is not something I would want to do again unless I had a LOT of time and patience. The thickness of the materials made it a real bear, but I did not want to have to go buy one from a store (made in China).

Cross that off the list! 

xoxo
Sarah

Thursday, September 6, 2012

A Fall Bag

9/7/12 Update: I ended up shortening the length of the bag. I thought I liked how tall it was but it actually hurt my shoulder having that much bag hanging. So it is about 2" shorter and is lighter now. :)

I found some time in between my normal life, my new part-time working life, and between diaper changes to make myself the fall bag I've been talking about. FINALLY! I know it isn't really fall YET, but I wanted to get it done by mid-month.

I used this "tobacco" colored linen and a bird's egg print for the interior. I wanted to add some buttons to the outside for looks (not functionality) so I made this little placket (i believe they're called?) with wood buttons. I also added a little brown gingham tab to one side of the bag for fun.


The REALLY neat part was machine-embroidering these vines on the straps and at the top of the bag for top stitching.I did brown on brown because I was afraid if I messed up it would show!


That's my day planner in there...
I stitched some velcro in because I was too lazy and rushed to do a snap or zipper!

Quite a tall bag, but I like it!


I did not make a cornered bottom on it so it sits flat against the body unless I stuff it, of course. :)

The obvious inevitable? Yes, it is going TO WRINKLE! But I like the look anyway. :P

So, I'm happy to have that done and to be able to use it from now on. I am not sure if I will use it through winter or make a new bag for that season as well. That'd be nice, but we'll see what the schedule allows!

Monday, July 9, 2012

Satin Pillowcase Project

This home sewing project was inspired by my new adventure in curly hair. I have naturally wavy/curly hair that I usually try to keep on the straighter side (by not really doing anything and just pulling it back all the time), but as of late I have decided to embrace my curly girl side. My hair does the "beachy waves" look pretty easily if I air dry my hair after twisting sections into what I call "rope curls" and then I CANNOT TOUCH IT until it dries! But it comes out pretty good so I have been going with this method (for about 2 weeks).

A trick I have always known benefits curly hair is using a satin pillowcase to keep your hair from rubbing while sleeping and friction causing frizz. So this is something I wanted to try. To make my own pillowcase in a design I would like, I set out to JoAnn's to get some materials.

Here is the cost breakdown:
  • Satin = $2.24
  • Cotton quilting fabric = ~$2.00 (used less than I bought)
  • White crochet trim = $1.00 (with coupon)
Total cost = $5.24
Not bad!

I remember when I worked at Sally Beauty Supply you could buy them there, but they were really cheap looking and feeling, so I did not want to go that route. So I chose this purple and green combo which is one of my favorites. I did not need to add the trim but I like the way it looks. The "Iris" purple and grass green make me happy!


This is a great project for a beginning sewer or someone who wants a fast project. This took me about an hour or less. Here is a link to a pillowcase tutorial similar to the one I made.

That checks one more item off my "home sewing" to do list...

Happy sewing & creating! :)

Saturday, July 7, 2012

Sew Inspired to Sew!

Hello!

I haven't been sewing much lately since it is hard to find time when all is settled on the homefront and I feel like it is cool for me to take a break and do a hobby, but this weekend I did find that time! :)

I sewed my niece a "Buttercup Bag" and I liked the style so much I sewed myself one in a new favorite fabric of mine. It is so sweet, summery, and juicy with these colors. They are all my favorite colors! I added a linen top panel to bring the intensity down a little, and then put two sweet little covered buttons at the top for fun. I am pretty happy with how it came out!

What is great is that this type of bag takes very little time to make compared to others in my pattern collection, but the down side is I can not sell these because the creator of the pattern said "no" to selling. :(


My favorite part is the interior fabric...
Orange and white polka dot! It reminds me of a creamsicle or orange julius...so sweet and fruity for summer! 

That's all from here!
God bless!

Sunday, July 1, 2012

Guys! I am super excited to show you this new summer hat I made! It is the cutest thing I ever saw and I just know you will want one too.

Check it out!


Umm, yeah. I kind of was a little *off* on the measurements when I tried to custom fit it to my huge head.

Now all I need to do is cut some eye holes in it and I can make sure I will be keeping that porcelain skin look all season long. 

And I will definitely be bringing that "potato sack" look back to the catwalks for next summer.

GAH!!

So I thought I'd do some fun hat looks with my botch job since it is a total loss other than that!

Gilligan's Island look


The Hipster Look


Remember "Blossom"?

That's all from here. I really need to take a vacation or something. This is another good reason I am not sewing for the shop right now. Sheesh.

Thursday, May 3, 2012

Keepin It Real...My Sock Dilemma

So this is where I've been keeping my stash of socks lately...
 Under my sewing machine!
They were in a basket and then I needed the basket for something else, so they just kind of got dumped here and I haven't done anything about them for awhile.

UNTIL TONIGHT!! {she says with her finger pointed in the air, determinedly}

 Ta daaaa!
A sock bag. Made with fabric I already had (i.e., I did not go out and use this project as an excuse to buy NEW fabric, like usual)!

I have a drawstring bag up for sale in my shop in case you find yourself putting socks in sketchy places like moi. :)

Wednesday, April 18, 2012

Sewing for Stress-Relief and Blathering On

Sometimes it is good for me to just grab some scraps and start sewing them into something and letting the project take itself where it wants to go. I tend to do this when I am stressed or anxious.

Last night it turned into a mug rug in these really loud, splashy fabrics. I love quilting and patchwork, but don't know what I'm doing past sewing the pieces together, so I thought I'd practice the art of quilting by adding some binding to the mug rug. I am not doing it the right way, probably, and it came out a little wonky. I tend to teach myself how to do things my way, and it is usually the wrong way, but I liked doing it, though, and that was what mattered. This one's for me, anyway, so I can stand it to be quite imperfect.

I really should look up how to properly bind bias tape. I am afraid it requires hand stitching though so I hate to have to do that. (Hear the laziness in my voice?) I am a child of the "bend the rules sewing" generation...

I also need to learn how to select fabrics properly. I tend to choose the loudest, brightest fabrics and put them all together and then wonder why it looks so...loud. And then I say to myself, "hmm...I like it, but I wonder if anyone else will?"

There is a science to fabric selection which I know includes picking one large scale print, one small, and one solid color (esp. with quilting). But solid fabrics are like poison to me. I don't want anything to do with them. I want pattern and design in my life! But I want to try doing things "by the book" and see what comes of it.

I dunno. I think the things we create say A LOT about our personalities, whether it be that we are old-fashioned, modern, artsy, kitschy, etc. It's what makes the world go around. God created us all with unique tastes and with our own set of DNA, and I think that's cool. There isn't really only one way to create something that is "perfectly correct". If 10 people set out to create the exact same thing from the same pattern and materials, that thing will come out a little bit different for each person who makes it. But He does set order and beauty before us and it inspires us to want to reflect that in what we make ourselves.

That's all.

Friday, September 23, 2011

Naptime-Made Coffee Mat

The baby's sleeping! Quick! I must sew something for my home!

This is how it generally goes... :)


So I sewed this patchwork quilted mat for my coffee maker to go on since it seemed so bare and lonely sitting there at the edge of the counter. I have recently begun drinking coffee again after quite a long time of going without it!


Now it has a cheery, coffee-hued rug to sit on!

I had lots of fun experimenting with my latest love-- free-motion quilting. I am learning as I go and have no idea if I am doing it right or not, but it looks good to me and I love doing it!

Review of S.O.T.A.K. Two in One Pouch

I decided to try out a new bag pattern designer named, SotakCo , and I love her stuff. She is from the Netherlands and has a great eye for d...