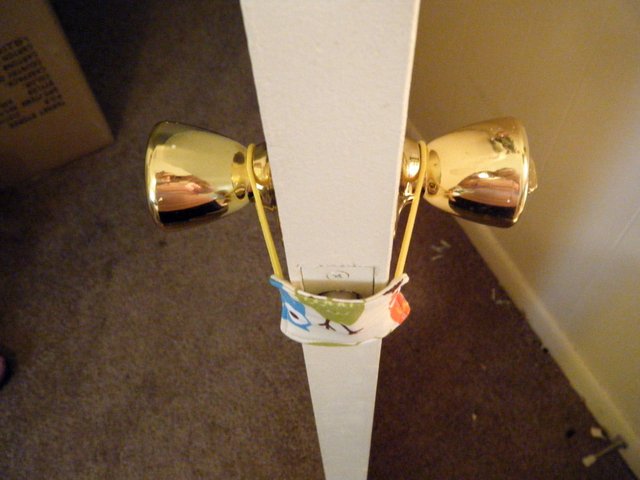
My son just turned two and one of his favorite things is going in a bedroom and shutting the door behind him...aaaaand sometimes locking it. This brings him great joy. Not for Mommy. Mommy FREAKS OUT! So I decided to halt all previous sewing projects to take a quick 15 minutes and make this door silencer/latch cover that I saw on Pinterest.
I did not find a tutorial so I made my own up. If you are interested in making one, I wrote the best instructions I could at the end of this post. It was a really easy and quick project that only takes
2 scraps of fabric, 1 piece of batting, and 2 hairties. Great naptime sewing project! Most crafters will have those things on hand, so I encourage you to make one if you have a newborn and want to keep the door quiet or if you have a sneaky toddler like mine. :)
(Please excuse the messy carpet and moving box. We are in transition...again.)
The door can still shut like normal without any latching going on! Great, huh!?
Instructions to Make Your Own:
1.) Cut two squares of fabric measuring 2 1/4" wide by 2 3/4" tall. I used quilting fabric.
2.) Cut one piece of fusible or sew-in batting using the same measurements. (I use sew-in)
3.) Place the batting on the wrong-side of one square of fabric and pin or fuse.
4.) Take a hairtie (the thin kind) and pinch it and place it along the edge and in the middle of one of the short ends of the square. Make sure the long end of the hairtie is in the middle of the square, not directed outward. Hold it in place until you get to your sewing machine.
5.) Do a tight zig-zag stitch to secure the hairtie in place in pinched position.
6.) Repeat for the other hairtie on the opposite side of the fabric square.
7.) Place the two squares together with right-sides facing.
8.) Sew a 1/4" seam around the square leaving about 1" to 1 1/4" open for turning inside out.
9.) Clip corners and any hairtie bulk sticking out.
10.) Turn rightside out, using chopsticks or something pointy to push out corners. Press opening.
11.) Stitch a 1/8" seam around the edge, enclosing the opening as you go.
12.) You're done!
I hope that made sense and please comment if it didn't! Have fun!