Showing posts with label Home Sewing. Show all posts

Monday, July 7, 2014

Vintage Sheet Cafe Curtains


I was going to do a whole tutorial on how I did this but I am too tired now so I will cut straight to the point!!


Found these vintage sheets at Goodwill....


Cut them into rectangles using a sheet of computer paper as a template...


Sew them together and then make tabs for the top....

Aaaand...you have a lovely, cottage-y feeling cafe curtain for your window!!

I just adoooore this look because it is so girly and bright. The sheets are made of muslin so they have this gauzy look to them and they flutter a little in the breeze. The fabric is so thin that you can cut your squares in a jiffy by folding the fabric over on itself and cutting all the pieces at once. I did 4x.

I have a lot of material left over so I am going to make a matching valance and then maybe some more curtains for my other windows in the kitchen/dining area. SO fun!! And the huge sheets are only about $2 depending on where you get them. I found 4 different prints at Goodwill on separate occasions. There is so much you can make from vintage sheets--just look on Pinterest!! 

Thursday, March 28, 2013

A Crafty Linky: How to Sew A Mouse Pad


Click on the photo to be taken to a wonderful tutorial on how to make your very own mouse pad in your favorite fabric!

Some strange things you need on hand that you may need to acquire:
  • ModPodge 
  • Shelf Liner
It is so funny I came across this this morning because I was just sitting down to my laptop and thought to myself, "I really need to make a mousepad". Then I went to Facebook and there was a tutorial. Love when that happens. :)

Would love to see the results if any of you decide to make one! (please leave a link in your comment or email me at sarahbhyde@gmail.com) It is definitely on my to-do list, but not sure when mine will get done.

Saturday, March 16, 2013

Good 1/2 Hour DIY Project: Eye Makeup Remover Pads

I am going to make as many of these as I can in the next 30 mins before I have to go get hubby. The toddler is napping and I have a bunch of flannel that needs to be used up, so what the heck.

I have been using eye makeup remover for the past few months (never have before that, actually) and was using cotton balls to take the makeup off. They seem wasteful and expensive when you go through about 4-5 a day. I ran out and now I am ready to make something that I can throw in the wash and keep reusing.

I would like to try the homemade remover recipe as well, but don't have any unrefined coconut oil on hand (the stuff I have is better for cooking). I also don't have distilled water. Maybe once I run out of the store bought remover I will have to make up a batch.

I think I will need to make about 20 of these pads...I wear a lot of mascara sometimes!

I think that keeping a mesh laundry bag in the bathroom near the sink would be a good way of making sure they don't get lost in the jumble of dirty clothes. Otherwise, I can see these easily becoming lost like dirty toddler socks do...

Sunday, December 9, 2012

Door Latch Cover & Silencer (My First Tutorial)

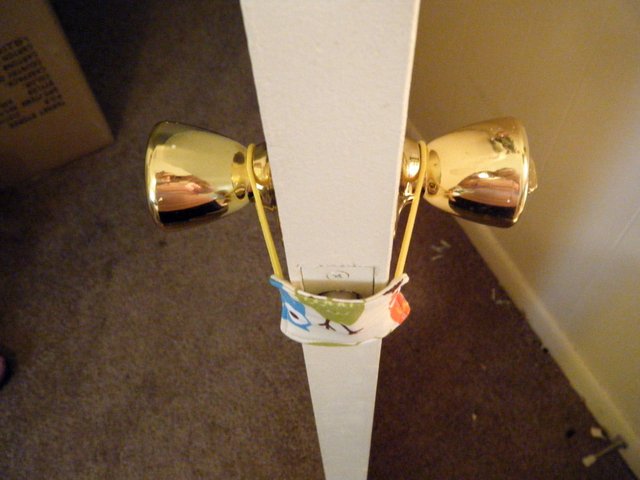
My son just turned two and one of his favorite things is going in a bedroom and shutting the door behind him...aaaaand sometimes locking it. This brings him great joy. Not for Mommy. Mommy FREAKS OUT! So I decided to halt all previous sewing projects to take a quick 15 minutes and make this door silencer/latch cover that I saw on Pinterest. I did not find a tutorial so I made my own up. If you are interested in making one, I wrote the best instructions I could at the end of this post. It was a really easy and quick project that only takes 2 scraps of fabric, 1 piece of batting, and 2 hairties. Great naptime sewing project! Most crafters will have those things on hand, so I encourage you to make one if you have a newborn and want to keep the door quiet or if you have a sneaky toddler like mine. :)


(Please excuse the messy carpet and moving box. We are in transition...again.)

The door can still shut like normal without any latching going on! Great, huh!?


Instructions to Make Your Own:

1.) Cut two squares of fabric measuring 2 1/4" wide by 2 3/4" tall. I used quilting fabric.

2.) Cut one piece of fusible or sew-in batting using the same measurements. (I use sew-in)

3.) Place the batting on the wrong-side of one square of fabric and pin or fuse.

4.) Take a hairtie (the thin kind) and pinch it and place it along the edge and in the middle of one of the short ends of the square. Make sure the long end of the hairtie is in the middle of the square, not directed outward. Hold it in place until you get to your sewing machine.

5.) Do a tight zig-zag stitch to secure the hairtie in place in pinched position.

6.) Repeat for the other hairtie on the opposite side of the fabric square.

7.) Place the two squares together with right-sides facing.

8.) Sew a 1/4" seam around the square leaving about 1" to 1 1/4" open for turning inside out.

9.) Clip corners and any hairtie bulk sticking out.

10.) Turn rightside out, using chopsticks or something pointy to push out corners. Press opening.

11.) Stitch a 1/8" seam around the edge, enclosing the opening as you go. 

12.) You're done!

I hope that made sense and please comment if it didn't! Have fun!

Friday, November 30, 2012

Adjusting to a Different Kind of Crafty Life

Hello! This morning I want to take you on a little tour of what's going on around my sewing space. I am not going to beat a dead horse (too much) and talk about the shop closing. All I can say is it is the end of one era and the start of a new one for the way I approach sewing and what I sew for. No longer am I sewing for the sake of money, but for creating gifts for others and items that I can use every day in my own life. It is such a weird feeling to be able to do that now, but I must say it feels pretty good. I will admit I have always dreamed of the day when I could sew whatever I wanted for whomever I wanted without that nagging feeling of needing to sell it in the shop. There is quite a bit more freedom in this. I never sewed NOT for money. It started out that way, but I shall not end that way! :)

So, that being said, here's what's going on in my world:

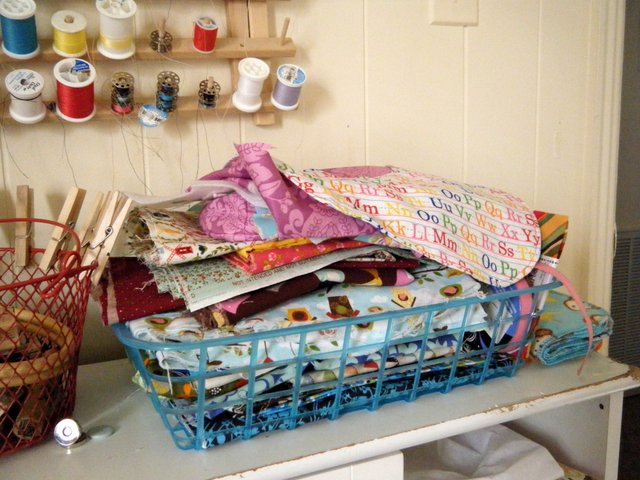
This is a basket of fabric waiting to be made into things. I have a 1/2 completed clutch, some baby gifts, and handbags that I am going to make. There is also a charm pack of squares waiting for a baby quilt to be made.


This is my latest crafting book that I purchased with some leftover birthday money on Amazon. Oh, how I love Amazon's cheap book prices! I went to B&N to check them out there and they were at least 40-50% more expensive off the shelf. 

This book is total eye candy and has some fun projects I'd like to try. The colorways inspire me because they are a tad different than what I am used to but I love how she uses all warm tones.


My crafting notebook. This is a list of things I want/need to get done by the end of December. I keep adding to it! I need to stop!


Here is what I ended up purchasing at Target to hold my patterns. I didn't get the fancy schmancy one because it was pretty but not functional for what I need. It would only hold a certain amount and I needed more space. I fit more than 21 patterns in this thing, though!


As you can see, there are many shoved in there. This is perfect and will be easy to store. When will I ever stop? A girl can never have too many patterns. :) 

I think that after Christmas I will try to share pics of what I have actually been sewing. I just have to wait until they are given out to people so I don't ruin the surprise. I'd like to do posts where you craft along with me on projects, so maybe that will be a goal for 2013!

Monday, July 9, 2012

Satin Pillowcase Project

This home sewing project was inspired by my new adventure in curly hair. I have naturally wavy/curly hair that I usually try to keep on the straighter side (by not really doing anything and just pulling it back all the time), but as of late I have decided to embrace my curly girl side. My hair does the "beachy waves" look pretty easily if I air dry my hair after twisting sections into what I call "rope curls" and then I CANNOT TOUCH IT until it dries! But it comes out pretty good so I have been going with this method (for about 2 weeks).

A trick I have always known benefits curly hair is using a satin pillowcase to keep your hair from rubbing while sleeping and friction causing frizz. So this is something I wanted to try. To make my own pillowcase in a design I would like, I set out to JoAnn's to get some materials.

Here is the cost breakdown:
  • Satin = $2.24
  • Cotton quilting fabric = ~$2.00 (used less than I bought)
  • White crochet trim = $1.00 (with coupon)
Total cost = $5.24
Not bad!

I remember when I worked at Sally Beauty Supply you could buy them there, but they were really cheap looking and feeling, so I did not want to go that route. So I chose this purple and green combo which is one of my favorites. I did not need to add the trim but I like the way it looks. The "Iris" purple and grass green make me happy!


This is a great project for a beginning sewer or someone who wants a fast project. This took me about an hour or less. Here is a link to a pillowcase tutorial similar to the one I made.

That checks one more item off my "home sewing" to do list...

Happy sewing & creating! :)

Monday, June 18, 2012

Prettying Up & Hiding Things


I attached this old valance I had made many years ago to my fabric shelf to hide the stacks of fabric that sometimes end up really messy. I used stick-on velcro to hang it up. I love that stuff!
 I am glad to have been able to use this valance again. I love roses and shabby chic stuff (plus so many other styles--eclectic!). I found it when cleaning out the linen closet today.

Maybe this will help me focus on one project at a time since I can't see all the possibilities! :)

Thursday, May 3, 2012

Keepin It Real...My Sock Dilemma

So this is where I've been keeping my stash of socks lately...
 Under my sewing machine!
They were in a basket and then I needed the basket for something else, so they just kind of got dumped here and I haven't done anything about them for awhile.

UNTIL TONIGHT!! {she says with her finger pointed in the air, determinedly}

 Ta daaaa!
A sock bag. Made with fabric I already had (i.e., I did not go out and use this project as an excuse to buy NEW fabric, like usual)!

I have a drawstring bag up for sale in my shop in case you find yourself putting socks in sketchy places like moi. :)

Friday, September 23, 2011

Naptime-Made Coffee Mat

The baby's sleeping! Quick! I must sew something for my home!

This is how it generally goes... :)


So I sewed this patchwork quilted mat for my coffee maker to go on since it seemed so bare and lonely sitting there at the edge of the counter. I have recently begun drinking coffee again after quite a long time of going without it!


Now it has a cheery, coffee-hued rug to sit on!

I had lots of fun experimenting with my latest love-- free-motion quilting. I am learning as I go and have no idea if I am doing it right or not, but it looks good to me and I love doing it!

Monday, September 12, 2011

A Handmade Summer

This summer I've worked on a lot of home projects, which was great. My favorite one was this dresser I painted for my son's room. I really love it and hope to keep it a long time. There had to be a bird involved, somewhere!


But now the seasons are changing and I am sad for all those summery sewing projects I didn't get to! Like using this fabric below for something sweet. But there is still time, and it is not turning cold and fall-ish in all parts of the globe. This fabric just screams "summer" to me, but I am still determined to make something from it. I am thinking it would make an excellent medium-sized drawstring bag for someone to take their delicates to the laundry room in, or for toys for a child's room. We shall see what comes out of my brain at the sewing table!

Saturday, June 25, 2011

Crafting + Fruit = Yummy Fun

My mom showed me how to make freezer jam since I've never done it before, and I had to incorporate a little crafting into the production! My mother-in-law had just given me some "found" country/vintage looking fabrics that were perfect for this project. The jars of jam looked so much spiffier because of them! :)

Here is a little photo-journaling of what we did:

 The ingredients and one batch ready to go


  Yummm


 Woop! Sarah brought out the fabric and got to crafting!! 
Couldn't help herself! :)
Found a canister with the right-sized bottom for making the jar "skirts"


 Cutting with the pinking shears


 Back to what we were really here to do... ;)


 Goodness in a jar


 Happy little jam pyramid


 Cuteness!! The little things make me happy.

 
 B&W


Done! Now to wait overnight and then freeze them and then EAT THEM!

This method of freezer canning was very simple and I would recommend it to anyone scared of the "real thing".

Fun Jam Topper Links:

Free Labels

How To Make Labels for Jar Canning {15 Printables}

Sunday, March 27, 2011

Laptop Sleeve Finished!

I checked my stash--no unisex fabrics (I can't help but buy pink and green, mostly!). This is what I purchased at JoAnn's yesterday that I think is pretty guy-friendly... :)  It is a geometric print, which is what I wanted to get for a project like this one.  The photos are pretty bad, so the color is actually nicer than what you see here.


The project probably took about 1 1/2 hours. I am guessing that since I have a baby and had to stop and start this project again and again over the course of two days. ;)  It is a really simple construction, which was great since I didn't have a lot of energy or patience what with moving and all. What was great was that the materials were all on sale! I used home dec weight for the exterior, flannel for the interior, and fleece for the lining. That should pad it pretty good!

I wouldn't mind making more of these in the future. I want to do a girly one at SOME point!!!

Review of S.O.T.A.K. Two in One Pouch

I decided to try out a new bag pattern designer named, SotakCo , and I love her stuff. She is from the Netherlands and has a great eye for d...